Sunday, September 25, 2011

Apple Bars

You know your recipe is a keeper when your cookbook looks like this.

Since much of what I bake is seasonal, I'm going to share some of my favorite recipes here as their season is upon us.  Fall... APPLES!  This recipe is a family favorite, and as you can see from the cookbook, it's a well-used recipe.  If I have nice round unbruised apples, I have an added bonus of being able to use my handy-dandy Pampered Chef apple peeler/corer/slicer.  That's always fun.  :)  As far as apples are concerned, I usually use Granny Smith or Haralson for baking. For a list of common Minnesota apples and their best uses, click here.  I hope you enjoy these as much as my family and friends do!

Apple Bars

2 1/2 c. flour
1 t. salt
2 T. sugar
1 c. shortening
1 egg + milk to make 2/3 c.
6 c. apples (peeled and diced)
1 c. sugar
1/3 c. flour
1 t. cinnamon
1 c. powdered sugar
2 T. hot water

Crust:  Combine 2 1/2 c. flour, salt and 2 T. sugar in a bowl.  Cut in shortening with a pastry blender.  Beat egg in measuring cup and add milk to make 2/3 c.  Mix well.  Stir into flour mixture.  Divide crust mixture into two piles, one slightly larger than the other.  Take the larger pile of crust and pat it into the bottom and up the sides of a 15.5 x 10.5 inch baking pan (I like to use the Pampered Chef bar pan).  Add a little flour if needed to get it to not stick to your fingers.  Reserve the other pile of crust mixture for the top crust.

Apple Filling:  Mix sugar, 1/3 c. flour and cinnamon.  Add apples and stir to coat the apples.  Dump the apples onto the bottom crust.

Top Crust:  Divide the remaining crust mixture into two equal amounts.  Lightly flour your counter and roll one of the pieces into a rectangle that will cover half the pan.  I usually hold the pan next to it to check that the size is right.  Carefully fold it into thirds to make it easier to pick up and place it on the apple filling, unfolding it so it covers half the pan.  Do the same for the other amount of crust mixture.  There will be a seam down the middle of the crust, but no one will care.  Trust me. :)

Baking:  Bake in a 350 degree oven for about 30 minutes, or until the crust is a little golden.  Cool completely.

Frosting:  Combine powdered sugar and half the hot water.  Stir it up really well so there's no lumps.  Add just enough of the rest of the water so it will pour off a spoon, but keep it pretty thick.  Drizzle it over the top of the cooled apple bars.

Enjoy!

Click here for a printer-friendly version of the recipe.  :)

Monday, September 5, 2011

Back to School

Though I'm excited for a new class of 6th graders, I'm very sad to see all my time for hobbies gone.  You probably won't see me here much for awhile.  But I'll leave you with a link to THE MOST FANTASTIC homemade granola bars ever.  During the school year I make a batch each weekend so I have them for the drive to school each morning.  I like to also add ground flax seed, Rice Krispies, chopped almonds, dried cherries, raisins, and dark chocolate (add the chocolate after you've spread them out in the pan).  Happy granola bar eating and happy new school year!
Photo from Happy Abode's blog.

Thursday, August 25, 2011

Curtain 9-1-1

I recently painted the kitchen.  Out with the green and in with the off-white.  I realized quickly that I would need to be purposeful about bringing in color since the walls were looking a little boring.  The kids and I hopped in the car and headed for Crafty Planet, my new favorite fabric store (when they should have been napping, I might add).  Since the curtains on the sliding door shrunk even more when I washed them, I decided to add some fabric to them.  I chopped off the bottom of the curtains so I could add a foot-high piece of fabric along the bottom.  Once I sewed it to one curtain and hung it up, I knew I needed to change it so the fabric would be on the top.  The tabs on the curtains came off and I sewed tabs to the fabric panel.  Viola... flip the curtains up side down and we have new-and-improved curtains for less than $10.

Oh, wait, it wasn't that easy.  When I cut the bottom off the curtains, I kinda sorta didn't cut it straight.  Boy, was that obvious once they were hanging up!  Ribbon to the rescue.  I bought a roll of 1 1/2 inch wide brown ribbon and sewed it over the seam between the curtain and the fabric panel.   Viola... curtains that look good!

I avoid pinning whenever possible, but when attaching the ribbon it was important to pin enough so the ribbon wouldn't shift.

My Favorite Raspberry Dessert

Every summer during raspberry season we eat raspberries with every meal.  I'm going to share one of my favorite raspberry desserts with you here.


Crust: 
1  1/4 cups flour
1/4 cups brown sugar
1/3 cups walnuts, chopped
1/2 cups butter, softened

Mix together and pat into a 9x13 inch pan.  Bake in a 350 degree oven for 18 minutes, until the crust is a nice golden brown.

I dump the crust mix into the pan, spread it out, and pat it in with my fingers.  Make it go up the side of the pan just a little.
Filling:
8 ounce package of cream cheese, softened
1/2 cup powdered sugar
4 ounces Cool Whip (1/2 of a regular tub), softened

Mix the cream cheese and powdered sugar together.  Fold in the Cool Whip.  Spread over the crust when the crust is completely cool.

Topping:
1/2 cup sugar
2 tablespoons corn starch
1 cup water
3 tablespoons raspberry jello
raspberries, washed and dry (I don't measure mine.  I'm guessing 4 cups.  It needs to be enough to cover the filling.)

Mix the sugar and corn starch together in a saucepan.  Add the water and stir.  Cook over medium heat until it's thick and gets more clear.  Add the raspberry jello and stir.  Carefully cover the filling with raspberries. Drizzle the jello mixture over the raspberries.  Cool and store in the refrigerator. 

ENJOY!


btw... Don't throw out that extra raspberry Jello.  Next up will be the recipe for Fresh Raspberry Pie!

Tuesday, August 9, 2011

It's time for some purse organization

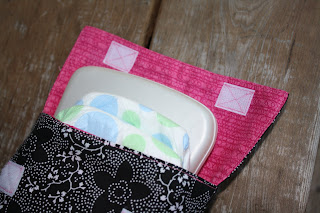
For those of you with kids, you know how crazy it gets trying to keep track of things in your purse, big diaper bag, and little diaper bag.  If you're like me, you're constantly shuffling things around between bags, hoping you got everything you need, but in a minimized space.  No, there's no room for the kitchen sink!  I decided to make a coin purse to keep my essential cards, some cash, and some change.  I also make a diaper and wipes caddy that can easily be tossed into a bag.

The coin purse tutorial came from Me? A Mom? and you can find it here.
The only thing I would do differently on the coin purse is to make sure that when the zipper is closed the handle is on the left.  It feels awkward for some reason to open it starting on the right.  I think I'll also add a little ribbon pull to the handle.

The diaper and wipes caddy came from Make It and Love It and you can find it here.


On the diaper/wipes caddy I had a hard time following the directions for sewing the lining to the outside fabric and ended up sewing them together a little differently than the tutorial directions showed.  I'll try to take some pictures next time I make one so I can explain what I did.

The "perfect" Barbie Mermaid Birthday Cake

My daughter just turned 4.  She's obsessed with Barbie and mermaids.  So when I found the idea of a mermaid cake made from a Barbie doll, I figured it would be PERFECT for her.  Even better, she asked that her cake be a surprise. :)

  I bought a chocolate cake, just as she requested.
    I bought gummy fish because she begs for them at the grocery store.
      I bought Fruit Roll-Ups Simply Fruit made from real fruit so at least part of it would be healthy.
        I stayed up too late assembling the cake in order to surprise her in the morning.
          My husband said he coudn't wait to see her face in the morning.


"Take my Barbie off of there!  <insert tears and sobbing here> Why is my Barbie on the cake?  I want her off of there now!" 

Not exactly the response I was expecting.  So... after a couple hours of "getting used Barbie on the cake" and a little talk with Daddy, she decided it was OK if Barbie stayed on the cake.  Wooooo-eeeeee!  I better start planning next years' cake now and give her some time to process it.

One day...

After lots of thought over a couple days, I decided to name my blog One Day.  As in... One day I'll finish that quilt I started 10 year ago...One day I'll have my fabric stash organized...One day I'll finish my son's baby quilt...  You get the picture. 

I hear there's a movie that just came out with the same title.  I don't know what the movie is about, but I imagine it has nothing to do with sewing, baking, or being a mom & wife.  :)